| Words in italics are French words. Click on an arrow to come back to the top of the page. |


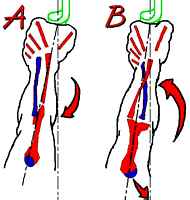
| Arm wielding the bow. Opposite, drawing A shows a correct positioning of the bow arm. The forearm or the wrist are not twisted and the axis formed by the bow is going outside but against the bow arm. Drawing B shows a bad aiming; the arm twists toward the bow axis. This position may results in bruises because of the string hitting the arm. This defect is more often seen with women than men. One shall reacts by forcing the rotation of the forearm and of the humerus like shown in drawing A. |
 |
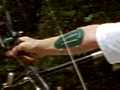
| Arm drawing the string. After the drawing, the position of the arm in relation with the shoulder and the bow arm is critical. The drawing arm elbow shall neither be too high (poor alignment with the arrow), nor two low (misalignment and shoulders are not used). Drawing shall come from back tension and results in shoulder blades getting closer. |
  Back muscles are much more powerfull and provide more stamina than arms muscles. You shall then focus on working with these muscles. |


| Accessory helping minimizing the bending of the arrow that has just been released. And thus, it helps minimizing the paradox. |  |
| Special place for Beursault. |  |
| Tool used to measure the brace height and the nocking points. | 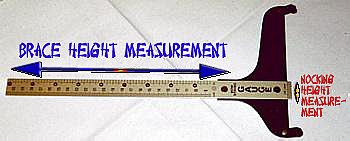 |
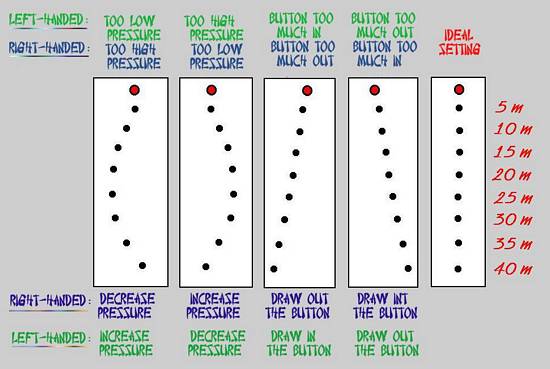
| The bow is less efficient with a bad brace height. It may be set more precisely with shots at long ranges where you have consistent groups of arrows. Observe the height at which arrows hit the target. Don't adjust the sight and just check you have good nocking points. Measure each impact on the target and do a graph as shown opposite. The best brace height corresponds to the highest point on the graph. | 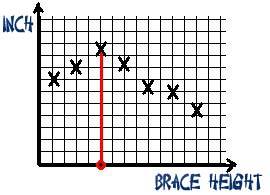 |
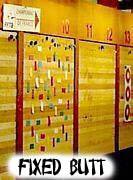
| Targets made of pressed or tied straw, foam, movable or fixed on which faces are pinned. | 
 |
| A good arrow-to-bow alignment permits a good flight of the arrow in straight line with the target.
This is one of the first thing to do for the tuning of the bow. Here a simple method to check and correct the alignment: Put adhesive tape on each limb and mark the center of each limb on it. Position the bow so that there is no pressure on the limbs (fastened by the central stabilizer to a chair or a table). Nock an arrow and look the bow making the string to be aligned with the marks on the tapes. Check the position of the arrow towards the string. The arrow shall point a little out of the string (toward left for a right-handed, toward right for a left-handed. This is important because the fingers, while releasing the string, transmit oscillation to the arrow. The berger button shall be adjusted so that the arrow points out about half the width of the shaft. |
 |
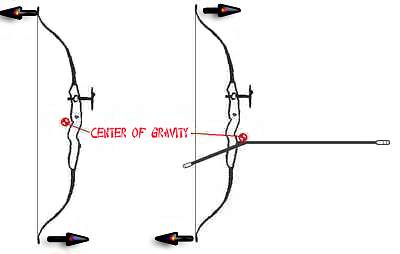
| The center of gravity is the center of the weight of an object. This is a pivot point on which
an object may be in a perfect balance. The center of gravity of a bow is an important parameter for its stability. It may be moved and set by using stabilizers so that the bow will have a better behavior after the release of the arrow. This is around this point that the bow will tip up when it escapes from the hand because of the reaction of the limbs when the string is released. The bow will behave correctly if its center of gravity is placed within an area in front and below the grip, not farther than 20 cm from it. |
 |
 |
Step 1: First, hang the bow by the string near the nocking point and find out the vertical line going through the center of gravity. Step 2: Then, hang the bow by the upper part of the riser and find a second vertical line going through the center of gravity. The center of gravity spot is at the intersection of the two lines. |
| Accessory used by the archer to prevent the string from catching the clothes around the chest. |  |
| The draw length is the distance from the nock of the arrow to the place where
the berger buttons, when the bow is at full draw. It is expressed in cm or in
inch. The draw length is directly related to the morphology of the archer. The height of the bow depends also on it. |  |
 FITA face,
 field face,
 trispot faces,
 | English faces, or FITA faces, are composed of 10 areas and have different diameters depending on the range: | 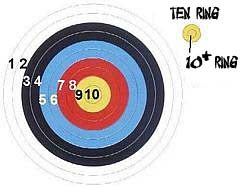 |
| Field laid out for the practice of archery. |  |

| This is the part of the handle on which the bow hand presses. |  |
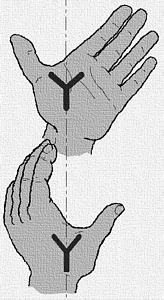
| The bow hand presses on the riser through the grip. The most common location of the hand on the grip, and certainly the best one, consists in pressing the grip along the Y running trough the hollow of the palm between the forefinger and the thumb. The pressure of the bow applies at the basis of the thenar eminence and in direct line with the wrist. Fingers must stay relaxed. If the archer uses a medium or a low shaped grip, the complete relaxation of the hand is possible. If the pressure of the bow does not exist, the hand would, ideally, drop softly without any contraction. Thus any undesirable move of the riser will be avoided: the hand or the wrist may move with a contraction of the palm and thus make the riser turns or cants. If the archer uses a high shaped grip, it will provide him with a perfect alignment of the pressure zone, the wrist and the bow arm. However, the archer will need enough strength in order to keep the position without getting tired. The risk is that the wrist drops. |
 |
| Finger must be placed as following if you use a sight: The forefinger is placed above the nock, the middle finger hooks just below the nock, and the third finger hooks under the middle finger. Both the forefinger and the middle finger shall not exert a pressure on the nock, otherwise, oscillations may be transmitted to the arrow; a light contact of the forefinger is admissible. |
 |
 |
Tool used to stick vanes on the shafts of the arrows
with precision. Opposite: vertical fletching jig. |
| Plastic accessory for the modern arrows put at one end of the arrow and that get the string. | 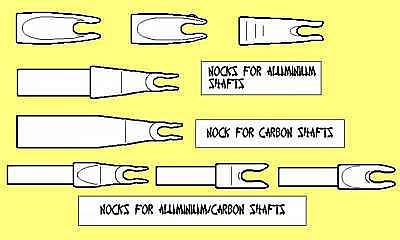 |
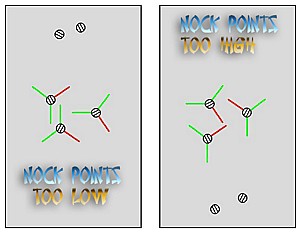
| In order to check the validity of the nocking point the following test may be performed
(see: tuning): Shoot on a target arrows without vanes and fletched arrows. The arrows without vanes are supposed to fly without the action of vanes that would stabilized their flight; they can show then any deviation due to the bow This test is performed with a target 15 m away, and allows to set the nocking point according to the hits of arrows with and without vanes. See opposite sketch. |
 |
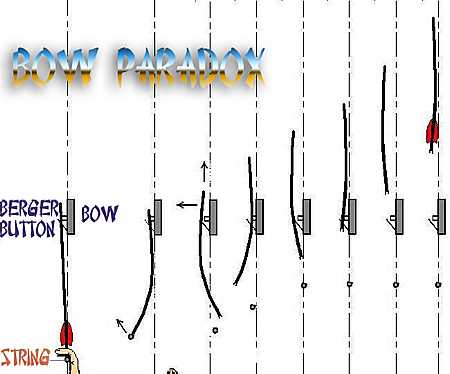
| Reaction of the arrow after the release also called the 'bow paradox'.
Despite the oscillations induced by the deviation of the string due to the fingers, the arrow fly to the target. The berger button helps to minimize this phenomenon. |
 |
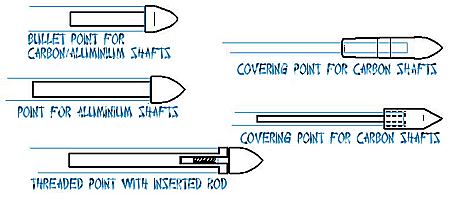 | End of the arrow which is pointed or bullet-shaped for target shooting.
Its weight is measured in grain. |
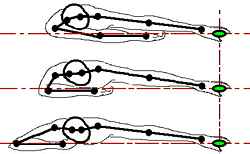
| The posture of an archer is very important if he wishes to make progress. The sooner he has
a good posture the better he will make progress. One of the major drift in the posture is if it collapses. Unbalanced by the weigh of his bow or because he draws a too strong bow, the archer may collapse (see opposite). The upper part of the body tilts backwards and the archer try to correct that by moving forward his head. This results in less efficiency (distance between the eye and the fingers is shorter) and in an underdeveloped draw length. |
 |
| Accessory used to carry the arrows. |  |
| Recurve bows have always been the more efficient bows. However, the more recent models are still less efficient than
the compound bows. Their are many different type of recurve bows: from beginners bows made of wood and glass fiber to the light alloy (magnesium, aluminium) risers with limbs made of carbon fiber or other high technology composite material. |
  |
 | Part of the bow holding the limbs Opposite, you may see a metallic machined riser, a cast riser, and a wood riser. Some risers are forged. Some beginner's risers are made of plastic, others of high technology materials such as composites (carbon fiber, Kevlar fiber and epoxy resin.) |

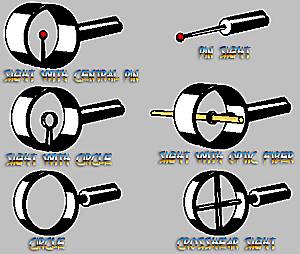
| The pin of the sight shall be aligned with the center of the target. The optic fiber allows a bright point. The rules allow no more than 2 cm long straight fibers, but a lot of archers use flexible optic fibers that may be much longer. The crosshair sight is also designed to aim directly the center of the target. The circle, however, allows thee archer to surround the target or the highest point zones. This is a good way to aim because we naturally position things in the center of a circle. Some sight rings are equipped with a aperture that may be set to the archer convenience. |
 |


|
 |
| Accessory used to balance the bow in horizontal and vertical planes. | 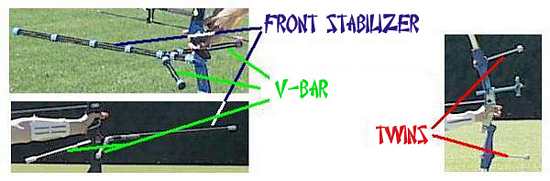 |

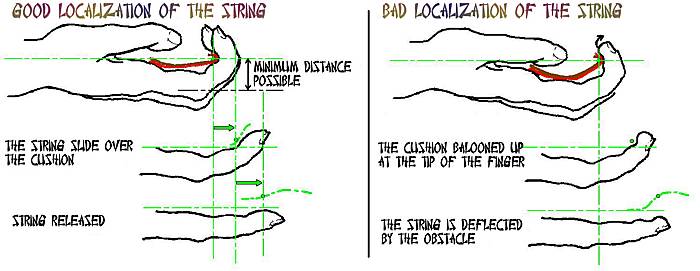
 |
Accessory made of leather and eventually other materials. It protects the fingers of the archer from the friction of the string. It also provide a wider contact area than with bare fingers. |
| A trispot face is mainly used for indoor shooting. Each spot have only the zones of 10 to 6 points. A face has 3 spots either arranged vertically or forming a triangle (Vegas). |  |
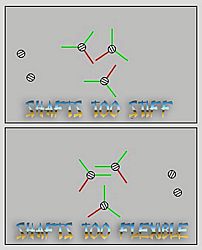
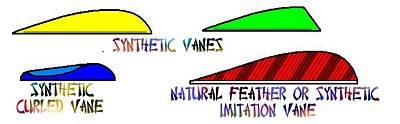
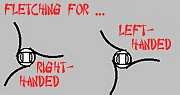
| The vanes are used to stabilize the flight of the arrows. They may be made of natural feathers
or of synthetic material (plastic, Millar); they may be flat or curved. Curved vanes (Spin Wing, Kurly Vane, ...) are not hazardly chosen. See opposite their positioning for left-handed or right-handed archers. |
  |
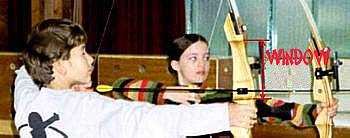
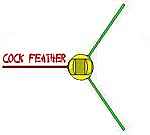 | Vane are carefully set on the shaft of the arrow. One of them, sometimes of a different color from the others, is set perpendicularly to the axis of the nock. It is called the index vane or the cock vane. The two other vanes (most fletching are made of 3 vanes), are set 120 ° from the index vane. This positioning prevent the arrow from being disturbed when it flies out of the bow window. |
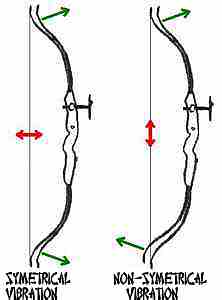
| The bow is subject to a lot of vibrations generated by: the limbs, the
string, the archer and the riser when the string is released.
If limbs are not balanced, they will generate asymmetric vibration to the bow. It may be necessary, in this case to set the tiller. The string will transmit vibration if the archer is not relaxed during the release. In order to minimize this horizontal and vertical effect, the archer shall completely relax his fingers when he releases the string. The string will be naturally freed. Forcing the opening of the fingers or 'pull out' the string will always generate undesirable vibration. The archer may also generate low frequency vibration during the drawing step and the aiming step. These shakings may come from the difficulty to draw the bow, the weigh of the bow, the tiredness, but also the natural movements induced by breathing, muscular tension, ... |
 |
| Vibration may be reduced by stabilizers. Opposite, this table might help archers to choose an appropriate front stabilizer according to the vibration he wishes to reduce. |
|